When I first started cosplaying as Alice Cullen, I thought I couldn’t wear foundation.
In those early years, any attempt to apply makeup inevitably went awry. Incredibly pale, perfect skin is the cornerstone of cosplaying as a vampire, which makes foundation a necessity. But what I discovered was that no matter the foundation brand, it looked uneven on my skin and flaked off. It was bad, so I avoided it – and makeup in general – for the longest time.
I didn’t know much about skincare back then. I sporadically used alcohol-based astringents, harsh drug store cleansers and thin moisturizers that weren’t compatible with my skin type, never sticking to a routine or applying them with any degree of consistency. I didn’t wash my face every night or moisturize every day. When my face flaked or flared up, I thought that was “just how my skin was.” I didn’t realize that I wasn’t taking proper care of my skin or giving it the attention it needed to look – well, good.
Basically? My skin didn’t look good – even when I was wearing makeup that was supposed to make it look perfect – because I wasn’t taking care of it properly.
These days, I’m hyper aware of the need for a good skincare regimen – and how important it is to start that regimen early. Better than any generation that came before us, we now understand the hazardous effects of sun exposure, the importance of hydration, and the need to tailor the products you use to your skin type to get the best use out of them.
After experimenting with skincare routines and products from a multitude of lines, I now follow a 10-step Korean skincare regimen, which has been the most effective way of managing my very, very dry skin. I know what you must be thinking: “Alice, you want me to do a 10-step skincare routine EVERY NIGHT?”
Yes. Now stop complaining.
No – I’m just kidding. First of all, the name is kind of misleading: you don’t do all 10 steps every day. Secondly, this is just me sharing what I do, and although it sounds intense, it’s actually a relaxing process that lets my body know it’s time to go to bed. And it actually works when it comes to making my skin feel brighter and more refreshed.
So what do I use – and how?
Step one: Makeup removing oil cleanser
Like most skincare routines, the Korean skincare regimen starts with cleansing, cleansing, cleansing. In fact, it’s called double cleansing: the act of removing your makeup first with an oil-based cleanser, and then washing your face again with a foaming cleanser to ensure all traces of makeup, dirt and oil have been removed.

My go-to oil-based makeup remover is a cheap and cheerful classic: Pond’s Cold Cream Cleanser. You can find this in any drug or grocery store, and it does a wonderful job of cleansing makeup and dirt from your skin. I slather my face with this every night, let it sit for a minute, and then wipe it off with a warm wash cloth. This prepares my skin for the next step: using a water-based cleanser.
I also love: LUSH Ultrabland beeswax cleanser | Boscia MakeUp-BreakUp Cool Cleansing Oil
Step two: Water-based cleanser
Even when you wash your face or use makeup removing wipes, residue from your cleanser or makeup can be left behind. That’s why it’s important to cleanse your skin again to make sure you’ve gotten everything.
After finishing with my Pond’s Cold Cream, I use the Laneige Multi Cleanser, a foaming face wash that’s designed for use on all skin types. It sweeps away dead skin cells and melts whatever makeup or impurities are leftover on your skin.

Laneige is a Korean skincare brand that is sold at Sephora, and you’ll notice fairly quickly that many of my staple products are from this line. Compared to a lot of other lines at Sephora, it’s very affordable – and the products last for a long time, even when they’re being used by a professed skincare addict like me.
I mostly apply the Multi Cleanser with my hands, but twice a week I’ll use it in combination with my Clarisonic Mia 2 Sonic Cleansing Device. If you’ve never used a Clarisonic, you need to add it to your holiday wish list immediately. It’s a small, lightweight, portable cleansing brush that uses sonic technology to get deep into your pores, meaning your skin gets way cleaner when you use it than it would if you were just using your hands. The Mia 2 offers two cleansing speeds and an automatic timer that ensures you aren’t using it for too long on any one part of your face.

Whether you have dry, sensitive or normal skin, the Clarisonic has multiple brush options, allowing you to purchase the one that’s right for your skin type. It’s not an exfoliator, but it does deep clean and help remove dead skin cells, which is why it’s only recommended for use two or three times a week. Using it any more frequently than that could severely irritate your skin.
If you do get a Clarisonic, never use it in combination with an exfoliating cleanser. Clarisonic technology works by oscillating the brush head more than 300 times per second, which is why you get that super deep clean in combination with a foam – but if you use an exfoliator with it, it’s too harsh and you’re effectively just irritating or tearing your skin. Yikes!
I use my foaming cleanser before I go to bed, and again when I wake up in the morning.
I also love: Drunk Elephant Beste No. 9 Jelly Cleanser | LUSH 9 to 5 Cleansing Lotion | FRESH Soy Face Cleanser | Too Cool for School Egg Mousse Soap Facial Cleanser
Step three: Exfoliate
Finding a good exfoliant has greatly improved the texture of my skin. Its coarse texture works to slough off dead skin, which is the common culprit behind skin that looks dull or dry. Incorporating an exfoliant into your routine will go a long way toward achieving brighter, fresher-looking skin. If your skin is dry, you should exfoliate once a week – twice if your skin is oily. But I’m also not a dermatologist, so don’t take my word for it – experiment and find out what’s right for you.
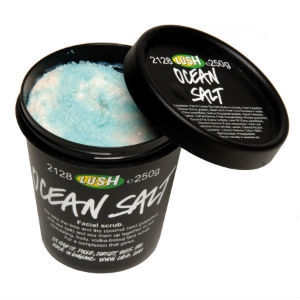
My favourite exfoliant is the LUSH Ocean Salt Face Scrub. It contains a mixture of fine and coarse sea salt, balanced with coconut oil and avocado butter to soften your skin. It smells amazing and it’s all-natural, so if you accidentally get some in your mouth, just savour that margarita taste and move on.
After double cleansing, apply your exfoliant to damp skin and rub gently. Many people are way too aggressive with this step, which can cause irritation, redness and dryness. After you’ve finished, rinse clean and pat dry.
On a side note, if you’ve been using St. Ives Apricot Scrub to exfoliate, just throw it in the trash. That particular product contains the shards of crushed walnut shells, which create microscopic tears in your skin. This allows bacteria to enter into the deeper layers of your skin and actually causes inflammation and impurities.
Throw. It. Out.
If your skin is extra sensitive and can’t handle an exfoliating scrub, try an enzyme peel gel instead. Typically, these peels are activated by adding water and function much like a classic face mask. You slather them on your skin, wait for them to dry, and then peel them off. You won’t get that “freshly scrubbed” feeling the way you would with a classic exfoliant, but it gets the job done. It’s all a matter of preference.
I also love: AmorePacific Treatment Enzyme Peel | Boscia Charcoal Deep-Pore Exfoliating Peel Gel with volcanic sand
Step Four: Toner
The best explanation for why you should use a toner comes from Soko Glam, the Korean skincare site I linked above:
Think of your skin like a sponge — it’s more difficult to re-hydrate it when it’s dried up and hardened than when it’s already a bit damp. Toners are the product that dampens your skin and balances its pH levels. Sprinkle one into your hands and tap it directly onto your skin or dispense it onto a cotton pad and gently swipe around your face working outwards.
Using toner is an essential step in your skincare routine, and finding one formulated without alcohol is key. Products with alcohol in them are incredibly drying, so be sure to check the ingredients when researching new products.

I love the FRESH Rose Deep Hydration Facial Toner, which is good for all skin types. The toner is infused with rose petals, which gently break down and become part of the liquid you’re putting onto your skin. Needless to say, it smells amazing and feels even better. Your skin feels refreshed and softly hydrated after use.
After washing your face, place some toner on your fingers and gently pat into your skin. You can use this twice a day: morning and night.
I also love: FRESH Rose Floral Toner | FRESH Black Tea Age-Delay Instant Infusion Treatment Toner | FRESH Peony Brightening Moisturizing Facial Toner
Step Five: Essence
Essence – also called “emulsion” – is the heart and soul of any Korean skincare routine.
Think of essence as a pre-moisturizer. It’s very lightweight and meant to be used after toner as a way to build up your skin’s moisture barrier. Essence has a higher concentrated dose of active ingredients like hyaluronic acid and delivers them deep into your skin after you’ve gone through the process of cleansing and toning.
There’s also an anti-aging element to essence – in combination with your moisturizer, of course. The more hydrated your skin is, especially if you start at a younger age, the better your chances of holding off premature fine lines or wrinkles. Right now, I’m using the Laneige Essential Balancing Emulsion for Normal to Dry Skin.

In Korea, the belief is that essence helps create a stronger, more resistant foundation for long-term improvement in the look of your skin. That being said, essence may not be right for all skin types. If you’ve got oily skin or acne, you may find it isn’t really for you.
But try it out. To apply essence, you’ll want to pat or press it into your face with your hands, starting at your chin and moving upward.
I also love: Farsali Unicorn Essence | Laneige Water Bank Essence |
Step Six: Serum
Like essence, serums have a few key, concentrated ingredients that are meant to address specific issues, like brightening dark spots or smoothing out fine lines. Serums are a bit thicker in consistency, almost like an oil, so they can’t really be mistaken for a moisturizer. They typically come in packaging that’s much smaller than a toner or cleanser bottle, but because they’re so packed with good ingredients, they tend to be a little pricier.
The good news is that serums are typically dispensed through pumps or eye droppers, so you only use a few drops at a time. A little can go a long way.
In the morning, I like to use the Drunk Elephant C-Firma Day Serum before my moisturizer. Like the name suggests, it’s packed full of vitamin C, making it great for use on dull, dry or uneven skin. Since it’s so lightweight, it absorbs nicely into my skin and creates a great base for my moisturizer.

For night time, I like the Drunk Elephant T.L.C. Framboos Glycolic Night Serum. This serum claims to resurface full skin by lifting away dead skin cells. Although I can’t speak to the science behind it, I’ve noticed an overall improvement in the texture of my skin since I’ve started using it.
If you’re wondering why you might use a different serum for day and night, the answer, of course, is that you don’t have to. But if a serum is heavy and takes some time to absorb into your skin, you may find that you just don’t have the time to wait for it to work when you’re getting ready in the morning.
If you’re feeling decadent – and let’s face it, I’m a little extra – I like to mix my night serum with a few drops of Drunk Elephant’s Virgin Marula Luxury Facial Oil to help minimize fine lines and rejuvenate my skin.
I also love: FRESH Black Tea Age-Delay Firming Serum
Step Seven: Sheet Masks
Sheet masks may be my favourite thing ever.
If you’ve never used one, they’re thin, micro-fibre sheets infused with key ingredients. Like everything else about your skincare routine, the masks you use should be tailored to the concerns you have for your skin. Each mask will focus on something different, like hydration, firming your skin, or brightening. Since my skin tends to be dry, I focus mostly on hydration and brightening.

I love the Too Cool for School Egg Cream Mask, which comes in firming, brightening and hydrating formulas. To apply the mask, just fit the sheet over your face and allow the ingredients to soak into your skin for 15-20 minutes. Once you’re done, remove the mask and massage the serum left behind until it fully absorbs into your face.
The goal is to do this at least once a week – but since your skin will feel so good afterward, you’ll want to do it more! These masks are a favourite of the Olympic Coven in Forks, as it’s a great way to refresh and brighten our skin after a long, tiring day in full makeup.
If you’re not a fan of sheet masks, traditional masking works just as well.
I also love: Sephora Collection Rose Face Mask | Peter Thomas Roth 24K Gold Mask Pure Luxury Lift & Firm Mask | LUSH Oatifix Fresh Face Mask
Step Eight: Eye Cream
For the longest time, I used the same moisturizer around my eyes that I used on the rest of my face. I didn’t understand the need to use two different products until I started developing small white nodes under my eyes called “milia.”
Here’s the gist: the skin under your eyes is incredibly thin and delicate, so it needs to be treated as such. Most facial moisturizers are way too thick and heavy for that delicate skin, so when the pores there get clogged, that’s when milia form.
So: your eyes need their own lightweight moisturizer. And don’t think you can skip this step by avoiding moisturizer altogether unless you actively want bags, wrinkles and discolouration under your eyes
 My staple is the Laneige Water Bank Eye Gel, which feels super cooling as you apply it to your skin. I learned from an associate at LUSH that eye cream is best applied with the tips of your ring finger, because they’re the fingers that have the least amount of force behind them.
Like serums, eye creams tend to be expensive because their ingredients are so concentrated. Don’t let that deter you from buying one. Because you need so little, eye creams tend to last for a long time.
I also love: Peter Thomas Roth Water Drench Hyaluronic Cloud Hydra-Gel Eye Patches | Tatcha Luminous Deep Hydration Firming Eye Serum |FRESH Black Tea Age-Delay Eye Concentrate | Drunk Elephant Shaba Complex Eye Serum | Peter Thomas Roth 24K Gold Pure Luxury Lift & Firm Hydra-Gel Eye Patches
Step Nine: Moisturizer
If you aren’t already moisturizing your face and neck twice a day, you need to re-evaluate all of your life choices.
Like everything else, make sure you’re using a product that’s compatible with your skin type. Right now, I’m using a multitude of moisturizing products. I turn to the Laneige Water Bank Hydrating Gel when my skin is feeling good, and the Laneige Firming Sleeping Mask when it could use a little more love. You’ll need a lighter weight moisturizer in summer and a heavier one in winter, when everyone’s skin tends to be a little bit more ravaged.

My favourite product right now is the Boscia Tsubaki Swirl Two-Part Gel & Cream Deep Hydration Moisturizer, which – as the name suggests – combines a gel and cream moisturizer together for extra hydration. It leaves my skin feeling incredibly smooth and soft, so I can’t recommend it highly enough.
I also love: Drunk Elephant Lala Retro Whipped Cream
Step Ten: Sunscreen
The final step – and perhaps the most important one – is sunscreen. After all, what’s the point of doing all of this to your skin if you’re not going to protect it from its harshest enemy: the sun?
Every morning and throughout the day, I use Shiseido Ultimate Sun Protection Spray Broad Spectrum SPF 50+. It’s a spray, which I like because it’s easy to apply over makeup and re-apply again before going outside. It has a pleasant smell and no greasy residue, which is key for not looking shiny throughout the day.
Oh, and for the record? You need to wear sunscreen every day. I mean it. Even in the winter. Even when you think the sun isn’t out. Even if you have dark skin or you “don’t burn.” Everyone. Needs. Sunscreen.
Listen to Alice.
Thinking of starting a 10-step skincare regimen?
I won’t lie to you: it isn’t cheap to invest in your skin. Starting a new beauty routine can be daunting because it typically involves a sizeable investment up front. If it’s something you want, you have to make it a priority. There have definitely been times when I’ve chosen to spend my money on skincare instead of makeup, new clothes, or going out to dinner with friends, because it’s become increasingly important to me over the years.
Some tips for getting started:
- Know your skin type. I thought I had combination skin until a trained esthetician told me my skin was actually firmly in the “dry” camp. Have your skin evaluated before you purchase a new line of products.
- Visit your local Sephora. The skincare employees there are trained to perform mini-facials using products found in store. If you’d like to try a specific product or line, ask an employee to use it in a mini-facial and explain how it should be used. Take note of how the product feels on your skin throughout the day. This will help decide whether or not you want to buy it.
- Ask for samples. Sephora is great for a number of reasons, the biggest being that they’re generous with samples there. Some of the products I listed are quite pricey, so you need to make sure you actually like them – and that they’re compatible with your skin type – before you buy them.
- Read reviews. People are vocal about the products they love – and hate – online. Read reviews from people whose skin type is the same as yours.
- Try new products. If something didn’t work for you, don’t buy it again.
It isn’t easy to look like a Cullen – but with a little help, you can at least avoid looking like the Volturi. 😉
xoxo,
Alice Cullen

Such an informative article- so many things I never knew about skincare! I had no idea about the apricot scrub, I’ve used that stuff forever! Would LOVE if you next did a post about what makeup you use in forks or even on a day-to-day basis, maybe even a makeup tutorial on YouTube if you so fancy 😉 great read as always!